Sunday, May 6, 2012

Choppin’s Nocturne No. 4 in V minor – Vegetable Medley

Okay, sorry for the cheese-ball title of this entry, but it is a food blog after all. Plus, puns used to be regarded as the highest form of humor. I promise. They said so on True Blood, and vampires would know, right?

So ‘twas a dark and stormy night at my dear older sisters dwelling when I decided to cook for her, her husband, and her five mewling babes. Fortunately for me, my sis happens to be a licensed O&M-Braille instructor. Note to those not in-the-know: O&M (Orientation and mobility) teacher - typically instructs the visually  impaired and blind at an early age to know directions, cane use, and how to trick sighted people into serving us when we’re too lazy to get somewhere on our own. There are also some independent living skills they endeavor to impart, and it was this knowledge I wished to tap that night. Here’s what I learned about chopping stuff up for a nice tossed salad as part of the meal.

Stuff You’ll Need:
Sharp knife
Cutting board (preferable a flexible bendy one)
A couple of ingredient bowls

Stuff you put in it
2 bell peppers (your choice of color)
Spring mix leafy vegetables for substance
1 Cucumber
1 Zucchini
Mini-Portabella Mushrooms (5 or 6 per person)
Large onion
Salad dressing

On Chopping
Now, this is rather counterintuitive. But I promise it works well IF YOU ARE FOCUSED AND PAYING ATTENTION AT ALL TIMES. For this reason, the very first step in chopping up veggies is to remove all distractions from earshot. Refer above to the mewling and hungry Cherubic Quintet. Banished!

Start with something non-threatening like a cucumber or zucchini. The grip is the most important factor in keeping things under your control, both on the veggie, and on the knife.
·       Knife Hand: Curl your pinky, ring, and middle fingers around the handle of the knife. Now with your thumb and pointer, pinch the flat edge of the blade’s base, point away from you and sharp edge down. You have the most control with these two digits.
·       Veggie Hand:  When grasping the cucumber, make sure your fingers are clasping the far side of the thing in a claw-like grip. That is, make your fingers bow outward so that only your fingertips, not your Braille-reading finger-pads are on the surface. Use your palm to steady it. This is the crazy part, but it works. With your pointer finger as a guide, set it so the flat edge of the knife is pressed up against your pointer fingernail, and align the knife where you want to make the first cut. You gotta, gotta, GOTTA make sure your finger stays perpendicular to the surface of veggie, the same direction your knife is going! Otherwise, this won’t be a finger-licking good recipe since you won’t have one to slurp.
Once you’re confident your alignment is good, use a sawing motion to dig into the poor helpless vegetable. I try to angle the knife so there is some forward pressure on the far tip, which should be pointing away from you. Did I mention yet that you need to have your fingers clawed and out of the way of your knife? Ok. Just makin’ sure. Do it!

Now that you know how to do it, here’s the order of operations.
1.     Wash the veggie.
2.     Prepare for surgery and proceed:
a.      Peppers: Cut off the stem top using our technique above. Slice the inner membrane out to reach the hollow innards. Dump seeds. Pull out the little fleshy strips that line the inner walls. Now just use the natural ridges as guides for your knife. It may be easier to cut the thing in half and start slicing from the inside. If the long vertical strips your making are too thick, use the technique above to cut them down to size.
b.     Onion: Cut off the top and bottom. To peel, use the knife to make an easy-pull-tab on the peel by cutting straight into the defenseless creature. Then just rip the whole layer off and trash it. Now, set it on a flattened edge upright and slice down the middle. Cry. Set both halves on the flattened edge you just made. Cry more. Then slice along the grain of layers using the above method. Weep piteously.
c.      Zucchinis and cucumbers: Just cut off the end caps. Make nice round slices with our new finger-guide technique.
d.     Mushrooms. Thoroughly wash these since they typically have dirt and crud still caked on. Dismember the stems and toss ‘em. Then set them on the flattened surface, and slice them like the cucumbers.
3.     Tip: Since you are the alignment guide here, you can easily feel how thick you’d like to make your slices.
4.     Throw all the goodies in a big bowl, including the spring mix, and get in there with your hands to toss it all up. Or, I suppose you could be civilized and use some new-fangled utensil like tongs.

Bam! Now you’re a master! When I was doing this, the sound of my knife hitting the chopping board was occasionally punctuated by the deathly screams of children as thunder raged outside. The lesson here is that if I, your hapless Half-Baked Host, can do it without even following my own advice about distractions, you should definitely have no trouble.

Wednesday, April 25, 2012

Vegan Energy Bars


Recipe Here!

 This is my contribution to the artistic world.  Notice the consummate angles of the slices. The variant on a Rembrandt-like stylistic motif almost calls forth in one’s imagination the horrifying tableau of a small child who, instead of being given a red crayon and construction paper to draw upon,  is given a sharp knife and brains as a canvas.  Mmmm, delicious. Enjoy this vegan delight, and prepare to tap your inner child as you splatter zombie-bait all over your kitchen walls and friends. (Crowd source suggestions here are welcome. How to be a straight slicer?)


Readers should note that most of these bars were given away to neighbors and friends. The tragedy is that I found out a bit later how gas-inducing this particular recipe turned out to be. Sorry! Secretly, though, we the blind sometimes concoct devious formulae such as this in order to verify that our guests actually did in fact eat what we made. Methane makes a great lie detector test for us.

Sunday, April 1, 2012

Grilled Rat Bordeaux Style


Grilled Rat Bordeaux Style
(Entrecote a la bordelaise)

Now that my thumb has healed up nicely from the Great Tater Caper from a couple of weeks ago, I thought I’d go for something a bit more exotic.

From a very rare cook book, I picked this recipe and I quote:

Alcoholic rats inhabiting wine cellars are skinned and eviscerated,brushed with a thick sauce of olive oil and crushed shallots, and grilled over a fire of broken wine barrels.

Yum!


On Eviscerating

Ensure that you have only the highest quality of wine-soaked rodent. A mouse will suffice, but definitely do not use a rat terrier or badger. That’s just not classy. If you happen to have access to a Ghanaen market (or other West African merchant where rat is very popular), I recommend the Cricetomys (“giant rat” – serves 8, not 6), or the Thryonomys (“cane rat” – easier to eat with chopsticks). Any of these choices are easy enough to eviscerate with a food processor. Just like that Bass-o-Matic commercial Dan Akroid did on SNL in the 80’s.


            Ok, so technically this is not evisceration, but I’ll grant a dispensation just this once to my blind brethren, as long as you wear a finger guard when using your Cuisinart.


APRIL FOOLS!!!


          I’m just kiddin’. This recipe sounds disgusting, don’t you think? It comes from a cook book by Calvin W. Schwabe entitled Unmentionable Cuisine.  The part about the West African diet is true though. Between 1968 and 1970, one market alone in Accra sold 258,206 pounds of cane-rat meat, and theAmerican pest makes up 50% of the meat locally produced in some parts of Ghana.

            The moral of the story is, always know what animal your meat has come from. Those pesky prankster pals might think some of your ingredients are imperceptibly fungible.

(No offense intended to my rat eating international friends; it’s just not my bag.)

Slimy, yet satisfiying.

Friday, March 23, 2012

Hearty French Potato Casserole (in Two Acts)

Cast
Me, playing myself
Roommate, playing the Doctor
Annebriated friend, playing the Guinea Pig
My patient guide dog, playing with his kong

 …and making her kitchen debut…

 Guest star, Queen of Hearts, the Cuisinart!


Act I, Scene 1 (Inspiration and Grocery Store)  ACTION!

Sweet! Now that I have this newfangled food processor, slicing onions and potatoes will be super easy and fast. Thanks to this new recipe from the latest in Cooks Illustrated, this will make a lovely side dish. Whip this up in no time. I personally feel that the Yukon Gold Potatoes are a must for this one.

 Not-yet-inebriated friend takes me to the grocery store to purchase fresh ingredients. We buy a big ol’ slab of peppered, generic bacon upon the doctor’s orders.

 And SCENE!
 

Scene 2: (back at home), dining room table

 First sign that I am having delusions of grandeur: Peeling these potatoes went much faster this time! The key is to not drink lots of caffeine beforehand, so your hands don’t spark, jitter and jive with excess energy. Take your time and lovingly, carefully sculpt each tater, as if you knew that it absolutely wanted to be excoriated and consumed, just for fun. These legumes did not have the problem in previous potato posers; there were very few spots on them to whittle down.


 Scene 3: (in the kitchen)

Second Sign of Afore Mentioned Delusions: I’ll get the sharpest knife I can find to cut these one inch bacon pieces. Stacking all 3 strips on top of one another will make it go faster. Taking my own advice from priorentries, I am cognizant of my fragile fingers when I use them as combination 1-inch measurement and slicing guide for the knife. Success! Easy and clean.

Enter, Queen of Hearts, the Cuisenart

 I go back and forth to the food processor, dumping in the peeled onion first. It is so amazingly quick, I am almost crying with relief…or maybe that’s the onions. Disassembling her Majesty, the onions get poured into a bowl and set aside. I’m continuing to feel around in the saucepan with this slotted spoon thingy to detect bacon crispness. Nothing yet.

The Queen is reassembled and the first bunch of peeled potatoes are done in a flash. Zippily I continue to check the bacon and make room for the last batch of the potatoes. The heat on the bacon is too low, I am thinking. They’re still really squishy. Bam! Potatoes done! Now to just disassemble the Queen one last …

…and "Off with your thumb!" the Queen decrees. My goddam thumb starts bleeding all over the floor. Her Royal bitchiness’ slicing blade didn’t want to twist out of the food processor bowl, which stands to reason, since it was meant to just be pulled straight up and out. Damn inflexible aristocracy.

 My guide dog lustily glares at the pooling blood on the floor in front of him before overcoming the temptation to clean it up, and then leaves, chuffing a rebuke under his breath. Damn precocious guide dogs.

 Crap! The bacon is still on high heat! Luckily, when I take the slotted spoon to the meat bits now, they are crispy, in spite of the smell of charred flesh comingled with fresh blood in the air. The show goes on…


Act II: Scene 1 (Kitchen as battlefield)

Medic! I cry, as I apply some quick battlefield first aid. The Doctor enters and applies his healing arts, as sounds of maniacal laughter can almost be heard from the Queen of Hearts.

 I now must finish this without being able to feel with my thumb, or even get it wet. Inebriated Friend (who has been drinking and laughing since Scene 2) gets some medicine from the Doctor (a.k.a., vodka for himself) and ensures that none of the blood seasoned anything we’ll be eating. He takes some more medicine/vodka just to be sure. (I don’t know either; but it makes sense to him.)

For the most part, I don’t even use proper measuring spoons throughout this recipe. I just kind of parcel it out into the mix as judiciously as I please. The broth is super easy; the cans almost exactly equal 1 ¼ cups. I end up using my hands to smush the unbaked casserole into place as the broth simmers. When I hear it lightly bubbling, I don the Long-Armed Oven Mitts of Protection and pour the lava onto the dish, making certain to pour away from me in case of splatter.

 Now that my thumb is no longer throbbing thanks to the Doctor’s tender ministrations, I feel confident once more to fight on.


Scene 2: Dinner Table

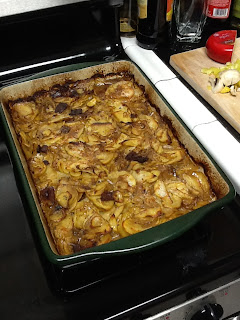
In spite of a first blood encounter, the dish turns out like it’s supposed to. I again use my hand as a guide to cut the casserole into even pieces with a pie blade. Injury has made me appropriately cautious. This ends up being almost completely devoured by my now trashed friend, and 3 others. The broth emulates the drippings of a non-existent roast nicely, with the peppered bacon, salt, and thyme setting off the flavor.

The curtain falls as Inebriated Friend stretches out on the couch, and the ghostly, haunting motorized grinding sound of the food processor cuts his yawn short.


Stuff You Will Need:

   measuring spoons
   measuring cup, liquid
   medium-sized saucepan
   A plate for bacon
   large mixing bowl
   Cutting board for bacon
   Can opener
   Vegetable peeler
   Onion slicing device (knife, food processor, etc.)
   Tongs or tossing implement
   Spatula or pressing implement
   Butter knife and plate
   Apron, oven mits, and dish towels.
   Courage and a sense of adventure. Also good medical insurance.
 

Stuff You Put In It:

   3 slices thick-cut bacon, cut into half-inch pieces
   1 large onion, halved and sliced thinSlotted spoon
   1 1/4 teaspoons salt
   2 teaspoons chopped fresh thyme
   1/2 teaspoon pepper
   1 1/4 cups low-sodium chicken broth
   1 1/4 cups beef broth
   3 pounds Yukon Gold potatoes, peeled
   2 tablespoons unsalted butter, cut into 4 pieces
 

1.     Adjust oven rack to lower middle position and pre-heat to 425 degrees. Grease a 9 by 13 inch baking dish.

2.     Cook bacon in a medium sized saucepan over medium low heat until crisp, 10 to 13 minutes.

3.     Using slotted spoon, transfer bacon to paper towel-lined plate. Remove and discard all but 1 tablespoon fat from pot.

4.     Return pot to medium heat and add onion and quarter teaspoon salt; cook, stirring frequently, until onion is soft and golden brown, about 25 minutes, adjusting heat and adding water 1 tablespoon at a time if onion or bottom of pot becomes too dark.

5.     Transfer onion to large bowl; add bacon, thyme, remaining 1 teaspoon salt, and pepper.

6.     Add broths to now-empty saucepan and bring to simmer over medium-high heat, scraping bottom of pan to loosen any browned bits.

7.     Slice potatoes 1 eighth inch thick. Transfer to bowl with onion mixture and toss to combine.

8.     Transfer to prepared baking dish. Firmly press down on mixture to compress into even layer.

9.     Carefully pour hot broth over top of potatoes. Dot surface evenly with butter.

10. Bake, uncovered, until potatoes are tender and golden brown on edges and most of liquid has been absorbed, 45 to 55 minutes.

11. Transfer to wire rack and let stand for 20 minutes to fully absorb broth before cutting and serving.


An adult beverage my roommate, The Doctor made for me as medicine for...
...the "handy" work of Queen of Hearts, the Cuisinart.

Hey, even I can tell that the Yukon Gold holds up to its name. Yum!

Sunday, March 4, 2012

Home Style Fries

Here’s a tasty party treat that only took me all day to create and half an hour to consume. It’s not too ambitious; feel free to laugh, though, when you discover how a single mistake can defeat the point of a recipe.

On Peeling:

I made a disaster of the peeling process. Equipped with my shiny new vegetable peeler, it took me a moment to familiarize myself with the pointy end. 3 ½ pounds of potatoes is quite a bit, so I hunkered down at the kitchen table, turned on a dystopian nightmare audiobook, and began cheerfully peeling my potatoes down to almost nothing.

Great! Less to dice. (Don’t judge me! There were all these weird bumps and discolored spots that I didn’t know were okay to kind of ignore.)

On Dicing:

I decided that I would take the instructions literally here. I play games. Lots of games. Board games, video games, role-playing games, head games, love games; you name it. So naturally I have dice lying around of all sizes, including ½-inch and 1-inch dice. I used these as guides for my knife when cutting up potatoes and onions.

On food color:

You’ll often get these instructions that say to pursue “x” task until “y” color is observed.  Such a pain…but try these tricks:

·       Scour the net or phone a friend to get an idea of the timing of activity. Browning burger takes 7 minutes, for example.  But I only recommend this option as a last resort. It leaved very little room for experimentation and artistry when you micromanage the cooking times.
·       For low vision folks, whip out your portable magnifiers and put on your face guards. Get right up into that food’s greasy face and put the smack down on that color-ID.
·       I have a handy device that speaks aloud the color of my clothes. In this way, I minimize the chance of getting incarcerated by the fashion police. If you have one of these, place some clear seran wrap over the censor and use it on your dish. Make sure and keep yourself away from splatter of hot juices and stove burners. Wear your hazmat suits if need be!
·       Often the sound, taste and texture of the food is sufficient to tell when the thing is ready. If your feeling adventurous and aren’t afraid of food poisoning, lift up a sample to your lips with a spoon, blow on it, and pop it in your mouth. Spit like a camel if its grody.

Your caramelized onions should be easy enough to feel with a spatula for firmness.

On with the show:

Brief science lesson for you here, courtesy of an old issue of Cooks Illustrated, from which this recipe is shamelessly stolen. Pectin is this stuff that holds tater cells together. Alkaline substances rip through pectin like a blind man rips into poor helpless potato peels.  As it happens, baking soda creates just such a nice alkaline substance when in water, raising the Ph. to about 8.1 in the case of our parboiled taters. Even the eensey-weensey bit of baking soda that is added here is enough to dismantle potato cells because a chain reaction is started when the 10 cups of water are introduced to the base powder. What this means is that the outer edges of the taters get all mushy and soft, while the inside stays firm and raw. When roasted, the outside gets nice and crispy, and the inside is soft and yummy.

So it would behoove you to keep this firmly in mind whilst meticulously following instructions.  Avoid making Mistake No. 1,240: forgot the damn baking soda. I, naturally, fell victim to this, and my dish turned out tasty, but mushy all around.


Stuff You’ll Need:
·       Rimmed baking sheet
·       Sharp metal spatula
·       Rubber spatula
·       Dutch oven (Helga, or other named)
·       Cutting board
·       Slicing knife
·       Vegetable peeler
·       Large mixing bowl
·       2 small cereal bowls (for onions and chives)
·       Dry and wet measuring cups
·       Measuring spoons
·       Long-Armed Oven Mitts of Protection

Stuff You Put In It:
·       3 ½ pounds russet potatoes, peeled and cut into ¾ inch dice
·       ½ teaspoon baking soda
·       3 tablespoons unsalted butter, but into 12 pieces
·       Kosher salt and  pepper
·       Pinch cayenne pepper
·       3 tablespoons vegetable oil
·       2 onions, cut into 1/2  inch dice
·       3 tablespoons minced chives

  
1.     Adjust oven rack to lowest position. Place rimmed baking sheet on a rack and pre-heat oven to 450 degrees.
2.     Bring 10 cups water to boil in Dutch oven over high heat.
3.     Add potatoes and baking soda.
4.     Return to a boil and cook for 1 minute.
5.     Drain potatoes and return to Dutch oven. Place over low heat.
6.     Cook, shaking pot occasionally, until any surface moisture has evaporated, about 2 minutes.
7.     Remove from heat and add butter, 1 ½ teaspoons salt, and cayenne; mix with rubber spatula until potatoes are coated with thick, starchy paste, about 30 seconds.
8.     Remove baking sheet from oven and drizzle with 2 tablespoons oil.
9.     Transfer potatoes onto baking sheet and spread into even layer.
10.  Roast for 15 minutes.
11.  While potatoes roast, combine onions, 1 remaining tablespoon oil, and ½ teaspoon salt in bowl.
12.  Remove baking sheet from oven.
13.  Using thin sharp metal spatula, scrape and turn potatoes.
14.  Clear about 8 by 5-inch space in center of baking sheet and add onion mixture. Roast for another 15 minutes.
15.  Scrape and turn again, mixing onions into potatoes. Continue to roast until potatoes are well browned and onions are softened and beginning to brown, 5 to 10 minutes.
16.  Stir in chives, season with salt and pepper to taste. Serve now!

It figures. Even when I'm NOT playing games, my luck persists.

Meat Lasagna


Prometheus in ancient Greek mythology gave to man the gift of fire. He also was well-known for his creativity and originality, hence we refer to a person with such qualities to be Promethean. His particular story is especially apropos when applied to the state of my sad, sad abilities in the kitchen, attempting to harness the powers of fire toward a creatively tasteful entrée.

 Here's how I wrestled against home-made meat lasagna. I scoured the net for a suitably challenging recipe that would teach me through trial and tribulation some new cooking techniques. This one is adapted from allrecipes.com and can be found at:


 The challenge focus for today manifests in a fairly varied ingredient list, so if you are trying to recreate this adventure at home, make sure before starting that all of your spices and seasonings are Braille or large print labeled correctly (refer to Kitchen Prep Posts for tips).

I always try to get all of my ingredients in a row before even putting on the apron. For low vision folks, it helps to have an ingredient placement system so you don’t accidentally put 4 times the salt into your sauce. Personally, I place them in a neat arc on the baking center in the order they are listed on the recipe.  Examining the list closely and noting the prep time of 3.25 hours, I took in a deep breath and prepared for a long day. In my past experiences, doubling that amount of time is more accurate.

To save a bit of time and money, I purchased pre-minced onions and sneakily borrowed some no-boil lasagna noodles, the fennel seeds and Italian seasoning from friends. No need to spend exorbitant funds on an ingredient you don’t foresee using often. See how Promethean I am?

For some reason, I thought that greasing the lasagna dish first would be a great idea. Casting about the kitchen for something suitably greasy, I found what looked promising inside a new container with which I was not familiar. Inside dwelt a semi-soft, lotion-textured substance. I bravely enlisted a visiting friend to taste test it, who informed me that the yellowish mystery cream was tasteless. And since he most notably did NOT die, I liberally used some. Later, my roommate vetted it to be some sort of room-temperature solid butter, the likes of which only erudite microbiologists know and use, and that I had never heard. (“clarified butter,” come to find out. I frequently misremember it as “streamlined” or “clensed butter”.) The mad science continued without disruption—for now.

In the spirit of all this prep work, I also whipped out everything I’d need in the cooking process. So with a clang and a clatter, out came the mixing bowls, wire whisks, rubber spatula, Helga the Dutch oven, apron, mitts,  tasting spoons, paper towels, and the fire extinguisher if I had one—I settled for baking soda instead. And the first aid kit, I noted, was also at hand.

Step 1 of this recipe instructs the sighted food preparer to thoroughly brown the delicious sausage and beef to prevent poisoning yourself and others. This is especially critical when dealing with pork products. But these kinds of instructions are useless as many of you may not know what brown is. Instead, find a way to ascertain the meat’s texture. Spoon some out and cut it with a knife. Put on mitts and tear some apart in your hands. Press down on it with a thin spatula. However it’s done, listen for the sizzling of the meat to go from an Amazonian rain forest downpour to a gentle Pacific Northwest cleansing shower. At that point, the meat should tear apart without any stringiness or rubbery-like texture. (Side note: seek out recipes that are more descriptive in terms of touch, smell, or other non-visual cues. They do exist!) Proceed…

Now to deal with the insane amounts of tomato products. I learned here that using a wide-brimmed measuring cup is best, as I later had tomato paste and sauce dripping rhythmically off of my sink faucet, counter top, and window sill. (Don’t ask.)  For the seasonings, I took a close friend’s advice and simply added the approximate correct amount to the sauce, and checked it for taste. (I say again! Am I not Promethean?) Unfortunately, I got distracted and added in 4 times the amount of recommended salt.  Tasting the sauce henceforth was dehydrating.
 
Step 2 was omitted thanks to the no-boil noodles. Mistake no. 4,423.

The rest of the process was fairly straight-forward. Layering noodles and cheese and sauce is tactile-intensive enough; don’t be afraid to get your hands dirty. And then…Voile! Present to all who dare a salty-sauced, rubber-noodled lasagna! (Note to self: Use regular noodles next time, thereby circumventing Mistake no. 4,423.)

 In the end, it only took me around 3.5 hours to prepare. The trick is to chop, grate, and slice ingredients while the sauce is simmering, which, by the way, is easily discernible when you hear the mixture intermittently, softly bubbling like a bog. Enforce your organizational system strictly for both your raw and prepared ingredients. The stakes here aren’t too high if you mix up the parm and the mozzarella, but what if it were…I don’t know…say for example…salt and garlic.


Ode to Helga, The Dutch Oven

Oh, Helga! You are so good to me.
You don’t horde your food greedily.
That non-stick bottom keeps you mess-free.

This actually kept well in the refrigerator for days and days...probably because of all the salt preserving it.

Sunday, February 26, 2012

Kitchen Prep: Mise en Place

Get Organized:


Label your stove dials, oven controls, microwave buttons, blender panel, and all other appliances in an accessible way. I use puff paint at each mark on the stove dial and microwave button. I have enough vision to use my iPad camera zoom feature to read the oven controls. Remember: the Braille labeler is your friend! You can’t possibly memorize every control, bottle of seasoning, or tool, so don’t try. Memory mistakes can leave your dinner guests gagging at best, and hospitalized at worst. If the space youre trying to label isnt large enough for a full Braille label, use this handy technique my roommate, the microbiologist, cooked up. Just Braille label (or large print) a single number. Then refer to that number on an accessible spreadsheet or computer document that contains the corresponding entry. Ergo, 1) Basil, 2) Thyme 3) Cayenne pepper, etc. If the labels are interchangeable, like with magnetic label tape for cans of soup say, dont let your mischievous friends mix them up on you as a gag. Instead, use the same ones and just change the spreadsheet as needed.   Thanks, roommie! Why didnt I think of that?


I definitely do NOT recommend using the Raizen Braille labeler. If you can find a 3M model, let me know where.


Keep handy wet wipes and some all-purpose cleaner. You’ll be using your hands a lot to locate sticky, gooey, and otherwise fun-for-kids textured items. There will inevitably be spillage, so make a game of how many things you’ll dump on the floor and laugh about it. Make a safe spot for your accessible recipe that has the least chance of getting splattered or short-circuited. I use an iPad that lives in the corner that I am assured will not explode or electrocute anyone. I keep a baby carrot in my apron with a notch on the end that I grab and use like a stylus to control the tablet. It keeps the screen from getting dirty and works just as well as your finger. Just don’t accidentally grab the pointer end, defiling it as well as your tablet computer.


There will be more tips mixed in with subsequent entries and entrees.